1. Flutter의 경우 android, ios, web 등의 접속정보를
각각 생성해 사용해야 한다.

android app용으로 google-services.json 파일 생성 후
그 안의 apiKey등을 웹에서 사용 할 수 없다.

2. 여러개의 firebase project는 1개의 App에서 사용할 수 있지만
그 반대인 여러개의 App에서 1개의 firebase project는 쓰기 어렵다.
(구글링 해 본 결과 1개 app은 1개 firebase project를 권장)

3. app/build.gracle에서 minSdkVersion은 19보다 크게하고
그 이하에서 실행되는 것을 고려하여 multiDexEnabled를 추가한다.
 defaultConfig {
minSdkVersion 20   ---> 19보다 크게
...
multiDexEnabled true
}


728x90

Liquid Text라는 생산성(?)앱이 있다.

맥북이나 아이패드 등에서 유용하게 쓰는 것 같은데

대략 $40정도, 학생할인이면 $25 정도하는 것같다

앱스토어를 통해서 개인적으로 구매하면 편한데
단체로 구매하려고 하면 앱스토어로는 애매해서 물어보니
Volume License라고 대량으로 구매할 수 있는 business portal이 있다고 한다.

https://business.liquidtext.net


LiquidText Business Portal


business.liquidtext.net

절차는 간단하다
회원가입 -> 라이센스 갯수 선택 -> 카드결재. 끝.
부가세 표시도된다.

회원가입은 간단하다.
email주소, 회사정보, 비밀번호 설정하면 회원가입과 동시에 라이센스 구매화면으로 넘어간다.
로그인화면 오른쪽 위에 Sign버튼을 누른다.
회원가입이 되었으면 email/password로 로그인하면 동일하게 구매화면으로 넘어간다.

회원가입 폼
다 입력하고 Continue to Checkout버튼을 누르면 회원가입이 완료되고 로그인 된다.

상품 갯수 선택

갯수는 10개단위로 할인이 없네...
갯수 선택 후 Contunue to Checkout를 누르면 결제창이 뜬다.


카드결제창으로 결제를 진행하면 된다.

다만... 할인이 없어서 ㅡㅡ 구매는 하지 않았다. ㅋ


728x90

go lang에서 go.mod 파일에서

indirect 는 go.mod에는 추가되었으나 소스코드 상에서 사용하지 않는 module

+incompatible 로 표시되는 경우
revision에 tag는 만들어져 있지만 root directory에 go.mod파일이 없는 경우, 즉 module 제작자가 go module로 선언하지 않았을 때 붙는 꼬릿말(suffix)이라고 하네

개발자가 이게 모듈이라고 처리해야 해결되는 것임.

참조 :

https://blog.puppyloper.com/menus/Golang/articles/Golang%EC%9D%98%20module%20system


Puppyloper's Blog


blog.puppyloper.com


728x90

flutter를 web으로 해서 test할 때,

firebase 에 정상적으로 image가 upload되어있고
image : NetworkImage(snap['imageUrl'])
를 했는데 코드에는 이상이 없는데 실행해서 보면

======== Exception caught by image resource service ================================================
The following ImageCodecException was thrown resolving an image codec:
Failed to load network image.
Image URL: https://firebasestorage.googleapis.com/v0/b/fir-example-9b685.appspot.com/o/profilePics%2Fafdfa?alt=media&token=1520201b-41e4-4be3-927a-37f2fe2b16c1
Trying to load an image from another domain? Find answers at:
https://flutter.dev/docs/development/platform-integration/web-images

위와 같은 에러가 난다.
strage이름이 profilePics이고 afdfa 로 올라가고 슬래시(/)가 퍼센트2F( %2F ) 로 되어있길래 경로가 잘못된건가 했는데
클릭해보면 해당 파일은 정상이다.

다음 명령어를 이용해 디버그모드로 실행해보면 정상이다.
(웹으로 확인할 것이므로)
flutter run -d chrome --web-renderer html
나중에 빌드는
flutter build web --web-renderer html --release

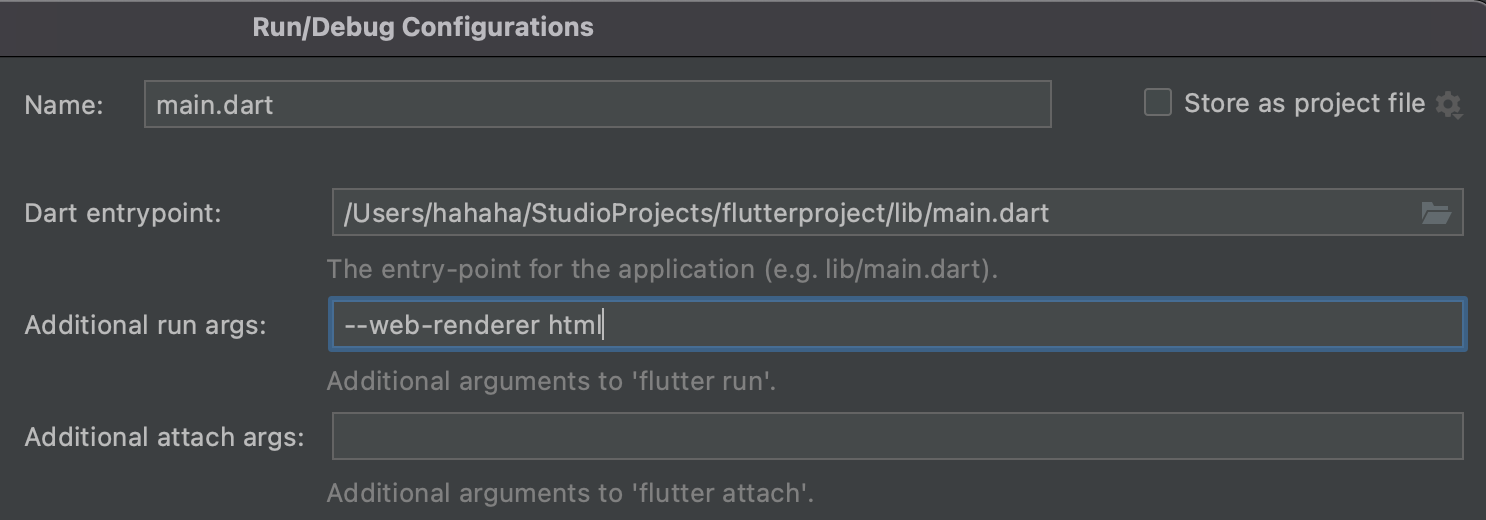
Android Studio 에서는 상단에
Chrome(web)을 선택한 상태에서 main.dart 항목에 Edit Configuration을 클릭한 다음

Additional run args 에 --web-render html 을 추가한 다음 apply 또는 OK 버튼을 누르면 된다.


728x90

gcp에서 vm생성한 후 원격접속하는 과정이다.

console에서 cloud shell을 연다.

gcloud beta compute ssh vm명
gcloud beta compute ssh instance-1

아무 설정도 안했기 때문에 주의 message와 함께 ssh key 생성여부를 물어본다
Warning: The private SSH key file for gcloud does not exist
...
This tool needs to create the directory [.../.ssh] before being able to generate SSH keys
Do you want to continue (Y/n)?   에서 Y로 진행한다.

Generating public/private rsa key pair.
Enter passphrase :  비밀번호입력
Enter same passphrase again : 비밀번호입력

그러면 key정보 등이 있는 위치를 알려준다.

이때 cloud shell의 현재 region과 vm의 region이 다르면
Did you mean zone [asia-east1-a] for instance : [instance-1] (Y/n) 이 나온다
현재 설정된 region은 asia-ease1-a인데 instance-1 이 맞냐? 안맞는데 Y를 눌렀더니
No zone specified. Using zone [asia-northeast3-a] for instance: [instance-1] 이라고 친절하게
instance-1은 asia-northease3-a 를 쓰고 있어 라고 알려준다.

현재 작업하는 region을 바꾸거나
Did you mean zone [asia-east1-a] for instance : [instance-1] (Y/N) 이 나오면 n을 누른다

다시 password 설정을 한다
Enter passphrase for key ... : 비밀번호입력

생성되어 해당 instance에 접속된다.

ubuntu의 xwindow를 설치한다.
sudo apt install -y ubuntu-desktop xrdp

(시간이 꽤... 걸리네...)

설치 후 데몬 활성화

systemctl enable gdm3
systemctl enable xrdp
service gdm3 start
service xrdp start

포트확인(3389가 열려있어야 함)
netstat -lntp

rdp 설정 및 연결

vi /etc/polkit-1/localauthority/50-local.d/45-allow-colord.pkla

[Allow Colord all Users] Identity=unix-user:* Action=org.freedesktop.color-manager.create-device;org.freedesktop.color-manager.create-profile;org.freedesktop.color-manager.delete-device;org.freedesktop.color-manager.delete-profile;org.freedesktop.color-manager.modify-device;org.freedesktop.color-manager.modify-profile ResultAny=no ResultInactive=no ResultActive=yes

수정후
service xrdp restart

이제 자신의 windows pc에서
시작 - mstsc

vm ip 입력
아까 생성한 비밀번호 입력

참조 : https://blog.dalso.org/google-cloud-platform-2/15905


GCP VM 인스턴스 GUI로 접근하기 - 달소씨의 하루

앞서 virt용으로 설치한 Ubuntu를 비롯한 GCP에서 제공하는 모든 이미지에는 GUI가 적용되어있지 않습니다. 그래서 Ubuntu에서 GUI를 사용할수 있도록 하는 Gnome을 설치해보도록 하겠습니다. 사용자 계

blog.dalso.org


728x90
 => [internal] load build definition from Dockerfile                                                                                                       0.0s4 => => transferring dockerfile: 214B                                                                                                                       0.0s  => [internal] load .dockerignore                                                                                                                          0.0s  => => transferring context: 2B                                                                                                                            0.0s  => [internal] load metadata for docker.io/library/ubuntu:20.04                                                                                            3.0s  => [1/5] FROM docker.io/library/ubuntu:20.04@sha256:626ffe58f6e7566e00254b638eb7e0f3b11d4da9675088f4781a50ae288f3322                                      4.7s  => => resolve docker.io/library/ubuntu:20.04@sha256:626ffe58f6e7566e00254b638eb7e0f3b11d4da9675088f4781a50ae288f3322                                      0.0s  => => sha256:626ffe58f6e7566e00254b638eb7e0f3b11d4da9675088f4781a50ae288f3322 1.42kB / 1.42kB                                                             0.0s  => => sha256:7cc0576c7c0ec2384de5cbf245f41567e922aab1b075f3e8ad565f508032df17 529B / 529B                                                                 0.0s  => => sha256:ba6acccedd2923aee4c2acc6a23780b14ed4b8a5fa4e14e252a23b846df9b6c1 1.46kB / 1.46kB                                                             0.0s
 => => sha256:7b1a6ab2e44dbac178598dabe7cff59bd67233dba0b27e4fbd1f9d4b3c877a54 28.57MB / 28.57MB                                                           2.7s
 => => extracting sha256:7b1a6ab2e44dbac178598dabe7cff59bd67233dba0b27e4fbd1f9d4b3c877a54                                                                  1.8s
 => [2/5] RUN apt-get update                                                                                                                               8.1s
 => CANCELED [3/5] RUN apt-get install -y nodejs npm                                                                                                   56740.1s

56740초를 기다려도.. 설치가 완료되지 않았다.

이유는 중간에
Geographic Area를 입력하라고 나오는데
숫자를 넣고 엔터를 쳐도 진행되지 않았다..

그러다
Dockerfile 에서
ubuntu 바로 다음줄에 추가하니 완료가 되기는 했다.
ARG DEBIAN_FRONTEND=noninteractive

추가로
docker push name/webserver:latest 를 한다는게
docker push name/webserver:lastest 를 했더니

tag does not exist 라고 나오고

태그이름을 확인한 뒤 제대로 입력했더니
denied: requested access to the resource is denied 가 나왔다.

docker login 으로 로그인을 하고 다시 docker push xxx 했더니 후아~~~ 된다.
docker 사이트에 repository에 tag목록에 있네 ㅎㅎㅎ


728x90

아니, 책에 있는대로
Dockerfile 을 만든 뒤
docker build를 했는데...

http://security.ubuntu.com/ubuntu cosmic-security Release 에서
404 Not Found [IP: xxx]

Docfile 에서
FROM ubuntu:18.10 으로 되어있는데
이 버전의 ubuntu관련 주소가 바뀌었다고 한다.

그래서 apt-get update 했을 때 404가 나는 것이었다.

FROM ubuntu:20.04 로 버전을 바꾸고 하니 잘 다운받네
근데
RUN apt-get install -y nodejs npm 부분에서 시간이 쪼매 걸리네...

아무튼 404는 해결됐으니 ㅎㅎ

728x90

FlutterFire는 Flutter 와 Firebase 를 연동하는 플러그인(?)이라고 보면되는데

firebase에 있는 cli 다운 및 세팅이 선행되어야 한다.
- firebase에 계정이 당연히 있어야 하고
- flutter도 설치되어 있어야 한다.

윈도우는 설치파일다운바다 설치하고
mac의 경우 다음 명령어를 실행하면

curl -sL https://firebase.tools | bash


비밀번호를 물어보고 다운받은 뒤 성공이라고 뜬다.

firebase login 명령을 하면
Allow Firebase to collect CLI usage and error reporting information? 을 물어보는데
사용정보를 모으는데 동의하냐라는 것으로 Y/n 중 n을 해도 상관없다

그러면 브라우저가 열리면서 구글계정 로그인을 하고
firebase설정 동의를 하면 성공이다.

그 뒤에 프롬프트 창에 그냥 아래 내용을 입력한다.
dart pub global activate flutterfire_cli
그러면 flutterfire 가 활성(activated)되었다는 메세지가 나온다. 안나오면 설치를 다시...

  그래서
flutterfire 를 쳐 봤더니... command not found: flutterfire 라고 나온다...
위에 메세지에서 보듯이 path가 맞지 않는다고...
그래서 export PATH="$PATH":"$HOME/.pub-cache/bin" 를 한 뒤에
flutterfire를 하면
FlutterAppRequiredException: The current directory does not appear to be a Flutter application project

그렇다... 현재 디렉토리는 flutter project와는 상관없는 위치다. ㅋㅋ
flutter 프로젝트를 생성한 뒤에 거기에서 "flutterfire"를 실행해야한다.

그런데,
샘플 프로젝트에 가서 flutterfire를 했더니
flutterfire: line 8: dart: command not found라고 하네...

dart도 설치
brew tap dart-lang/dart
brew install dart

그래서 dart 설치도 마쳤다.( dart만 실행시켰을 때 어쩌고 저쩌고 내용이 나오면 됨. 안나오면 문제있는것으로 경로문제일 듯.)

다시 flutterfire를 프로젝트에서 쳐 봤다니 ㅎㅎㅎ
어쩌고 저쩌고가 나온다.
이제는 제대로 된 명령어로
flutterfire configure
하니까 검색을 쫘~악 하더니 1개를 찾았다.


새로만들것인가 있는 것을 쓸 것인가. 위 아래 버튼으로 고르면 되는데
(새로 만들자 ㅎㅎㅎ)

그런데.... 분명히 없는 프로젝트 이름을 했는데...있다고 나오네?

그래서 아무이름을 했더니... 진행된다 ㅡㅡ. 뭐징?
먼저 platforms. 기본으로 android, ios가 체크되어 있다. 방향키를 내려 web에 놓고 스페이스바로 체크
엔터를 치자 firebase(파이어베이스의 프로젝트)에 현재 만드는 어플이 사용등록 안되어 있다고 bundle id(=package이름)을 넣으라고 한다.

com.nobang.flutterfire라고 입력하자 ios에 등록, android에 등록했다고 한다.
그러면서 접속관련 키정보는 lib 폴더 아래에 firebase_options.dart 라는 파일에 저장되어 있다.

사용은

lib/firebase_options.dart 파일을 import하고
main.dart에서는 같은 경로에 있으니까
import 'firebase_options.dart';  //또는 import 'package:프로젝트명/firebase_options.dart'

init해서 사용
await Firebase.initializeApp(
  options: DefaultFirebaseOptions.currentPlatform,
);

현재 flutterfire version 확인 : flutterfire --version
0.1.1+2 로 나오네..


Firebase Cli설치 참조 : https://firebase.google.com/docs/cli#install-cli-mac-linux 


Firebase CLI 참조  |  Firebase Documentation

Test SDK for Cloud Functions for Firebase

firebase.google.com


728x90

아무것도 안하고 flutter app을 생성했는데 오류가 난다.

이유는 android sdk를 못잡아서 그렇다 ㅡㅡ;
flutter는 android studio로 하는게 맘편하지만
일단 Intelli J 에다 설정하려면
android studio를 설치하고 그곳의 sdk경로를 intelliJ 에 set하는 방법이 있다
(물론 다른방법도 있겠지만 다른것은 못찾았다.)

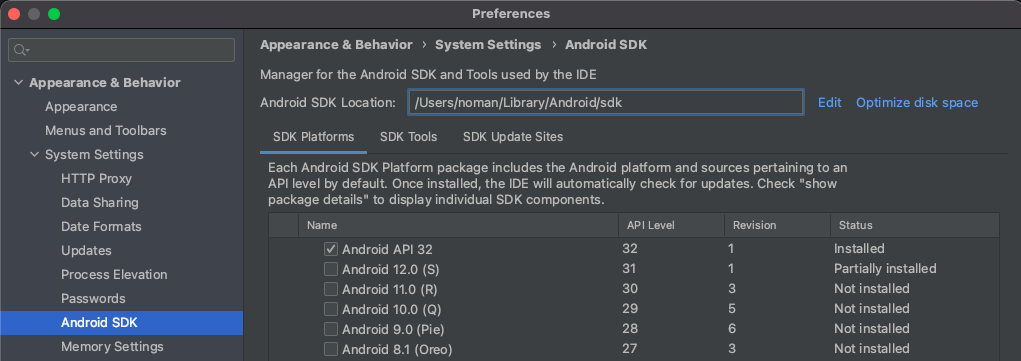
mac의 경우 android studio를 실행하고
화면 좌측 상단에서 "Android Studio" > Prefrences를 누르면
Appearance & Behavior > System Settings > Android SDK 가 있다.
여기에서 Android SDK Location 위치를 복사한다.


이제 Intelli J를 실행하고
화면 좌측 상단에서 "Intelli J IDEA" > Preferences를 누르면
Android Studio와 위치가 좀 다르다
Build, Execution, Deployment > Android > Android Project Structure에서
SDK Location 이 비어있을 것이다.
(비어있지 않고 sdk경로가 있다면 문제가 없겠지만 ㅎㅎ)
위에서 복사한 Android SDK Location을 붙여넣고 Apply를 하면 된다.

이렇게 하면
flutter Cannot resolve symbol 'Properties' 오류는 잡힌다.

만약
GradleException 오류가 나고 있다면
해당 app/build.gradle 파일에서 오류나는 GradleException을 FileNotFoundException 으로 변경한다 API29부터 바뀌었다고 한다.

728x90

Error: MissingPluginException(No implementation found for method getDatabasesPath on channel com.tekartik.sqflite)

Android Studio에서 target을 android나 ios 로 하면 sqflite가 저장되는 곳이 있어서 에러가 나지 않지만
web 으로 했을 때는 에러가 나는 것 같다.

동일한 소스를 web 으로 run했을 때만 위의 에러가 난다.

728x90
BLOG main image
"그게 뭐 어쨌다는 거냐?" 늘 누가 나에게 나에대한 말을할 때면 이말을 기억해라. by nobang

카테고리

nobang이야기 (1933)
Life With Gopro (7)
Life With Mini (79)
Diary (971)
너 그거 아니(do you know) (162)
난 그래 (159)
Study (290)
속지말자 (10)
Project (34)
Poem (15)
Song (0)
Photo (113)
낙서장 (45)
일정 (0)
C.A.P.i (2)
PodCast (0)
nobang (27)
고한친구들 (4)
recieve (0)
History (0)
android_app (2)

최근에 올라온 글

최근에 달린 댓글

최근에 받은 트랙백

Total :
Today : Yesterday :